Open source DAW · written in Rust
    Perform
    **→**
    Arrange
    **→**
    Mix


    One track, three workspaces, in that order. You **Perform** it from a pad grid,
    you **Arrange** what you played on a linear timeline, and you
    **Mix** it on a real console. Capture is the hinge between the first two: it
    turns a live performance into editable arrangement.
The real grid uses the same keys: 1234 / QWER / ASDF / ZXCV, rebindable in the app.
Perform
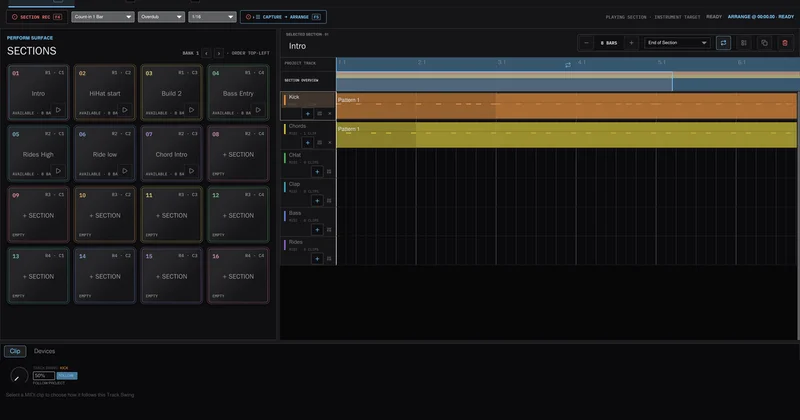
Workspace 01Sections are reusable multitrack loops that share your project's tracks, instruments, effects and mixer. You author one with the same editor you use in Arrange, then launch it from the pad grid. The same 16 pads do three jobs, and F1 to F3 pick which.
- Sections modeLaunches on a musical boundary: immediate, 1 beat, 1 bar, or end of section. A Section triggered slightly late still lands where you meant it.
- Instrument modeThe same 16 pads become a playable instrument for the selected track, with Full Level, 16 Levels and Note Repeat.
- Track Mutes modeMute and unmute tracks on that grid, through an anti-click ramp so tails gate cleanly instead of clicking.
- SwingModelled on the MPC2000XL. Set it per project, per track, or per clip, and automate it.
Arrange
Workspace 02 · where the performance landsArrange is the linear timeline. Multi-track audio and MIDI, clip drag, resize, split and join, time selection, looping, an overview minimap, warping with tempo follow, a piano roll, and automation across tracks, devices, plugins, buses, sends and master.
Capture is how a performance gets here F5
Capture records an entire performance, Section launches, live playing, mutes and automation gestures, and writes it into Arrange as ordinary clips and automation lanes you can edit afterwards. It is timed against the audio engine's sample clock, not the UI frame rate. Captured material keeps no reference back to its Sections, so editing a Section later never rewrites a take you already recorded, and everything Capture writes is material you could have drawn by hand.
Mix
Workspace 03A real console rather than a row of faders. Every channel has its own four band EQ, pan, fader, metering, mute and solo. There are buses, returns and sends, the master is an actual channel, and the device rack below follows the selected one. It hosts the built-in synth, sampler and drum rack alongside VST3 and CLAP plugins with their native interfaces.
Keys
The whole keyboardThe pads are the four rows in the middle of the keyboard. Everything else is transport and editing, and the app never steals a key from a text field you are typing in.
Perform
F1Sections mode
F2Track Mutes mode
F3Instrument mode
F4Section Record on and off
F5Capture into Arrange
1
Q
A
ZThe pads, four rows of four, rebindable
[
]Previous and next pad bank
NNote Repeat while held, in Instrument mode. Reserved, so no pad can take it
ShiftShow the instrument target overlay while held
EscCancel a key rebind
Transport and view
SpacePlay and stop
Ctrl
LLoop the arrangement
Ctrl
0Zoom to fit
Ctrl
1
2Narrow and widen the shared grid
Ctrl
3Triplet grid
Ctrl
4Snap to grid
Ctrl
5Adaptive grid
Ctrl
ZUndo
Ctrl
Shift
ZRedo, or
Ctrl
Y
EscStop the audition, then cancel whatever is being edited
Arrange and clips
Ctrl
TAdd an audio track
Ctrl
Shift
TAdd an instrument track for MIDI
Ctrl
↑
↓Move the selected track up and down
Ctrl
C
X
VCopy, cut and paste clips
Ctrl
DDuplicate the selected clip
Ctrl
ESplit at the playhead
Ctrl
JJoin the selected clips
Ctrl
MCreate a clip from the time selection
Ctrl
Shift
LLoop the selected clip
Del
BkspDelete selected notes, otherwise selected clips
ShiftHold to add to the selection
Piano roll and Browser
BToggle draw mode
Ctrl
ASelect every note in the clip
←
→Nudge selected notes by one grid step
↑
↓Transpose selected notes by a semitone
↑
↓With no notes selected, moves through Browser results
EnterImport the selected Browser sample into the arrangement
Alt
←
→Make the Browser narrower and wider
    **On a Mac, press Cmd.** Everywhere these tables say Ctrl, macOS uses Cmd instead.
    The app resolves a single command modifier per platform, so a shortcut never wants Cmd
    for one thing and Ctrl for another.
What it does not do yet
v0.1.4It is an alpha and worth saying so plainly. Linux is the primary development platform; macOS and Windows build and pass CI on every change but get less hands-on testing. Projects save to a self-contained versioned container, but breaking format changes are still possible.
MIDI input. One port at a time, notes only, into the selected instrument track. The pads are computer keys today; controller mapping is the next milestone.
Recording. No audio input, no MIDI recording, and no MIDI output. Section Record and Capture work on what the app itself plays.
Safety nets. No autosave or crash recovery yet, and no audio fades or crossfades.
Download v0.1.4
Released 9 August 2026Direct downloads. Nothing is code signed yet, so macOS and Windows will both want a word with you the first time.
x86_64
        Make the AppImage executable first:
        ```
chmod +x vibez-v0.1.4-linux-x86_64.AppImage
./vibez-v0.1.4-linux-x86_64.AppImage
```
Apple silicon and Intel
        vibez is not notarised with Apple, so macOS will refuse to open it. After dragging it
        to Applications, clear the quarantine flag:
        `xattr -dr com.apple.quarantine /Applications/vibez.app`
        You can also allow it under System Settings, then Privacy & Security, after the
        first blocked attempt.
x86_64
        The installer is unsigned, so SmartScreen will show a blue warning. Choose
        `More info`, then `Run anyway`.
Or build it yourself
You need a stable Rust toolchain and, for the time stretcher's C++ build, a C++ compiler and libclang. On Linux, also install the audio and device headers.
sudo apt install libasound2-dev libudev-dev libdbus-1-dev
git clone https://github.com/alexanderwanyoike/vibez
cd vibez && cargo run --release
      Then open `assets/demo.vibez` from the File menu to hear something
      immediately.