Tom's Hardware Verdict
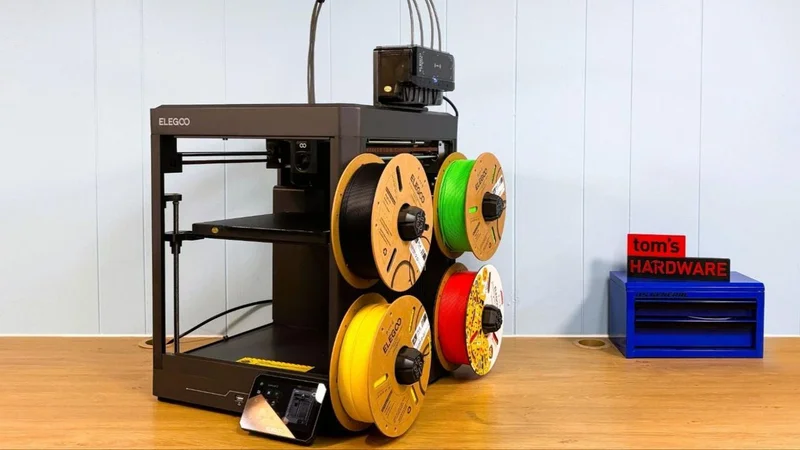
The Centauri 2 Combo is a stripped-down version of the Centauri Carbon 2 and is a very good four-color, Core XY printer. It lacks creature comforts like lighting, a camera, and an enclosure, which greatly limits its range of filaments.
Pros
- +Less expensive
- +No cloud access required
- +Prints 95A and harder TPU with ease
Cons
- -No camera
- -No lighting
- -Spool holders do not work well with many filament spools
- -Cold plate is not sticky enough
Why you can trust Tom's Hardware
The Elegoo Centauri 2 Combo is a stripped-down version of the Centauri Carbon 2, but we’re left wondering if losing the camera, lights, enclosure, and ventilation is worth the $60 you’re saving. This printer is so affordable, one wonders if Elegoo is making any profit at all.
The math and naming convention are downright puzzling. The Centauri 2 Combo is currently on sale for $319, while the single-color Centauri Carbon is $309, the Centauri Carbon 2 is $329, and the Centauri Carbon 2 Combo is $379. Forgive us if we need an evidence board and spool of red string to make sense of all this.
You’re still getting a lot of printer for your money. It’s a fast Core XY machine with the rock-solid CANVAS four-color system and a 256 mm cubed build volume. The toolhead can get to a toasty 350°C with 110°C on the bed, which is great for a bunch of technical filaments that you ultimately can use without an enclosure, but it does come in a pinch for printing less finicky high-temperature filaments like PET-GF and PCTG.
The big question is, is it worth the savings? A lot of beginners only use PLA, and see a four-color machine as a toy printing factory. But you might regret not getting that enclosure when you start getting into more practical prints and could really use the strength of an ASA print.
Ranking this printer was difficult, because yes, the print quality is great and it’s easy to use. But with so many other, even better, Centauri options available, this one just falls short of making our list of Best 3D printers.
Specifications: Elegoo Centauri 2 Combo
|
| 256 x 256 x 256 mm (10.07x10.07x10.07 inches) |
|
| PLA/PETG/TPU (up to 350°C) |
|
| Direct drive |
|
| .4mm hardened steel |
|
| PEI-coated steel flex plate, both smooth and textured, heated |
|
| Automatic, Including Z offset |
|
| Yes |
|
| LAN, WiFi, USB Flash Drive |
|
| 5 inch Color touchscreen |
|
| 500 x 480 x 500 mm (19.68 x 18.89 x 19.68 inches) |
|
| 15 kg (33.06 lbs) |
Elegoo Centauri 2 Combo: Included in the Box
The Elegoo Centauri 2 Combo comes nicely packaged with almost everything you need to get started. There is a bag of tools, hardware, and a coil of white PLA. Noticeably absent is a nozzle wrench. There is a paper copy of the manual along with a USB stick containing a PDF of the manual and a copy of ElegooSlicer. The spool holders, touchscreen, and CANVAS system are also packed inside the printer.
Elegoo sent spools of black, red, yellow, and white PLA equipped with RFID tags to test for this review (but you'll need to buy those separately).
Get Tom's Hardware's best news and in-depth reviews, straight to your inbox.
Design of the Elegoo Centauri 2 Combo
The Elegoo Centauri 2 Combo is an open-frame Core XY printer with both the X and Y axes running on linear rods. The Z axis runs on three linear rods and is driven by three lead screws, belted at the bottom, driven by a single stepper motor.
The Centauri 2 Combo uses the same brass high-flow nozzle with a hardened steel insert as the rest of the Centauri line, and the hot end can get up to 350°C.
Since the printer is open frame, the single-part cooling fan in the toolhead cover is more than sufficient.
One of the only frustrating things about the Centauri 2 Combo is the filament hub attached to the top of the toolhead. The collets holding the Bowden tubes into the top are almost impossible to compress enough to remove the tubes. Elegoo has a tool that can be printed to make this easier, but it does not work well. Even if you can remove the Bowden tubes, every clog I’ve had on any of the Centauri has required the removal of the hub. On the Centauri Carbon 2, I was able to do this without removing the toolhead wiring, but not on the Centauri 2 Combo.
The toolhead wiring is a USB-C cable that is held down, inexplicably, with two Phillips-head screws. The hub is held on with two screws threaded directly into the plastic of the hub. Fortunately, the Centauri 2 Combo does not clog often, and I’ve yet to strip out the holes in the hub.
Elegoo suggests printing a one-color hub for use with TPU, and includes a press-fit collet for this purpose. However, I had no problem feeding 95A TPU directly from the CANVAS into the four-port hub. I tried using a softer TPU, and it also fed into the hub, but it ended up clogging the extruder.
The CANVAS system for four-color printing is pretty much bulletproof. The only quirk in the system is the way the spools are numbered. It makes sense for the way the filaments enter the CANVAS, but it’s easy to confuse spools three and four when assigning colors on the printer.
The spool holders on the Centauri 2 have a return spring that draws filament back onto the spool when it is retracted from the CANVAS system. They work well with many brands of filament - but not all. We had to print alternative spool holders to run Prusament and a few others that did not fit.
The Centauri 2 has a very nice 5 in touch screen with a well thought out and intuitive UI.
Assembling the Elegoo Centauri 2 Combo
The Elegoo Centauri 2 Combo is shipped mostly assembled. After removing the packing material, you must remove three screws that hold down the bed. There are stoppers attached to the lead screws that must be removed as well. The touch screen is connected via a ribbon cable and slots into place on the front of the printer without tools.
There is a bracket to mount the CANVAS system to the top of the printer with two M3x50 screws, and the CANVAS mounts to the bracket with three M3x8 screws. The filament hub attaches to the toolhead with 2 M3x6 screws, but also requires the removal of the toolhead wiring, which is attached with 2 Philips head screws. The CANVAS cable attaches with the right-angle connector going into the back of the printer and the straight one into the CANVAS. The four Bowden tubes run from the top of the CANVAS to the ports in the toolhead, and the order does not matter.
When powered up for the first time, the printer gives you a reminder to unlock the bed and remove the lead screw stoppers.
Leveling the Elegoo Centauri 2 Combo
The Elegoo Centauri 2 Combo does a self-check and full calibration when initially powered up and offers to level the printer at the start of every print. The system works perfectly.
Loading Filament on the Elegoo Centauri 2 Combo
Loading filament on the Elegoo Centauri 2 Combo is simple. For Elegoo RFID-labeled filament, the spool can be held against the reader on the CANVAS until it beeps, and then the spool can be assigned to any of the four slots. For other filament brands, the type and color must be chosen manually from the touchscreen. The filament is inserted into the Bowden tube corresponding to its spool holder. It’s easy to confuse spools three and four, with spool four being in the top rear position.
Preparing Files / Software for Elegoo Centauri 2 Combo
The Centauri Carbon 2 Combo comes with a copy of ElegooSlicer, which is based on OrcaSlicer and Bambu Studio. The program will feel like home to anyone familiar with those programs.
ElegooSlicer now features Nexprint, Elegoo’s online file sharing service, which is currently listed as beta. Nexprint allows users to select files directly from the slicer’s home screen. It currently has a more limited selection than its rivals, but should grow over time.
Printing on the Elegoo Centauri 2 Combo
The Elegoo Centauri 2 Combo comes with the usual sample of white PLA. You should go to our guide of the best filaments for 3D printing to begin printing in earnest
For the first print, I chose the pre-sliced two-color bed scraper that is included in the printer’s memory. The print took 1 hour and 30 minutes and looks fantastic in Elegoo’s red PLA and white PLA. One thing I noticed on this and other multicolor prints is that Elegoo seems to have refined the default purge values to reduce purge waste, which is very welcome.
For a large multicolor print I chose a collapsible star fidget from Makerworld. I painted it in the slicer to use all four colors on the printer and it turned out very nice using Elegoo white, black, red, and yellow PLA. Using a .2mm layer height, and running at an average of 120 mm/s, the print completed in 5 hours and 13 minutes.
I decided to fill the smooth cool plate with a bunch of small pieces, and the results weren’t great, even after using some glue stick. Fortunately, after cleaning the plate and flipping it back over to the textured side, things worked much better. I printed Leonjong’s 6 wheel antweight combat robot from printables.com. By US classes it’s called a “fairy weight” robot and fits with room to spare on the Centauri 2’s build plate. The entire plate printed perfectly on the first try and looks terrific in Polymaker’s gray HT-PLA. The print took a little over four hours, with a .2mm layer height and an average print speed of 70 mm/s.
To try out PETG, I printed a set of three funnels from Makerworld using red Polymaker PETG and the default Anycubic PETG profile. The print came out perfect, with just a tiny bit of stringing across the mouths of the funnels. With a .2mm layer height, the medium funnel took 2 hours and 30 minutes to print with an average print speed of 90 mm/s.
The large and small funnels ran together and took 4 hours and 48 minutes at the same settings.
For TPU, I tempted fate by trying some LW TPU that turned out to be way too soft for the extruder. It loaded just fine through the filament hub, but clogged in the gears almost immediately.
After clearing the problem, I printed a boomerang I found on Printables. Using a .2mm layer height and an average print speed of 50 mm/s, the print completed in 1 hour and 56 minutes. It has a few strings, but the boomerang looks great in Cookiecad pale blue elixir. Sadly, it didn’t really work when I tried tossing it around the yard. Maybe next time we’ll try PETG.
Lastly, I had to try a print that would take advantage of the high hotend temperature the Centauri 2 can reach. Polymaker’s PET-GF is a nice, semi-technical filament that is right in the sweet spot for the open frame Centauri 2. Running at 350 °C and using a modified PETG profile with 1 mm of retraction was perfect. I printed steering parts for my husband’s RC dragster that we’ll show off at 3D Printopia this fall. Using a .2mm layer height and an average print speed of 65 mm/s, the parts took 1 hour 23 minutes to print. The quality of the parts is just perfect.
Bottom Line
Currently on sale for $319, the Elegoo Centauri 2 Combo is the most budget-friendly four-color Core XY printer I’ve seen. From the well-designed UI to the rock-solid CANVAS 4-color system, the printer is really a joy to use, especially if your main interest is 3D printing colorful toys, decor, and gadgets.
For only $60 more, you can get the fully enclosed Centauri Carbon 2 Combo, which is a heck of a deal for a machine you won’t outgrow. For $10 more, you can get the single-color, fully enclosed Centauri Carbon, which is still our favorite budget 3D printer. But you have to admit, it’s quite a bargain when you compare any of the $899 Centauri printers to the current reigning champion Core XY machine, the Bambu Lab X2D, a machine with dual nozzles, five colors, and one of the best ecosystems around.
Denise Bertacchi is a Contributing Writer for Tom’s Hardware US, covering 3D printing. Denise has been crafting with PCs since she discovered Print Shop had clip art on her Apple IIe. She loves reviewing 3D printers because she can mix all her passions: printing, photography, and writing.