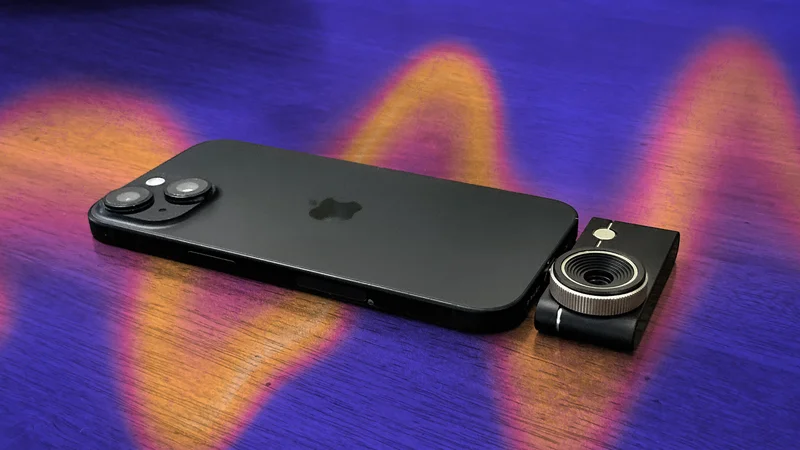
Thermal Master P3
Pros & Cons
- A simple add-on that plugs into a phone and works within a couple of minutes
- Supports iPhones and Android phones
- Effective heat mapping and pinpoint temperature measurement
- Can zoom in and isolate areas for more focused analysis
- Effective at detecting hidden cameras, insulation issues, water leaks and more in my tests
- Comes with its own secure case for traveling
- High-quality design
-
Tons of customization options, even a birdwatching mode
-
Expensive
- Struggles with accuracy near reflective, metallic surfaces
Thermal imaging once belonged to the professionals and pricey equipment only. Now, a new type of device allows anyone to access surprisingly advanced thermal imaging directly on their phone. I tested out one of the latest models, the Thermal Master P3, and came away amazed at how much it can do, both around the home and on vacation.
Not only did the Thermal Master P3 ($279) prove capable of detecting hidden cameras, like the ones that many have found in vacation rentals, it could also help spot insulation issues, detect certain kinds of water leaks and more.
Read more: Fast Tricks to Spot Hidden Cameras in Your Vacation Airbnb
While the thermal detector add-on is around $300, that’s still less than most would pay for a home inspection, and it can be used repeatedly during different seasons, on multiple trips and more. The design quality is superb, it supports both iPhone and Android phones, and the camera comes in a case small enough to store in a pocket when not in use. Plus, setup only took me a couple of minutes in total.
Here’s how I used this little thermal masterpiece and the many problems it can address. While it does have some classic thermal imaging baggage, like struggling with reflective metal surfaces, you’ll be surprised by just how useful the P3 can be for the average person.
A compact, quality design for any phone, plus effortless setup
The Thermal Master P3 offers top-notch quality with a metal framework and its own carrying case, which you’ll want to use to keep the cam add-on undamaged when not in use. It has a 25Hz refresh rate and can detect anywhere between -4 degrees and 1,112 degrees Fahrenheit, with plus/minus 3.6 degrees accuracy and plenty of calibration options.
The Thermal Master app, which is entirely free to use, is packed with features. The good news is you don’t need most of them to get started: I downloaded the app, plugged the camera into my phone port, switched it to Fahrenheit and was looking at heat maps within a couple of minutes.
You can adjust magnification, switch temperature color palettes, adjust measurement distance and ambient temperature, set emissivity and plenty more (even a bird watching mode), but none of it is really necessary when standard settings work so well. Unless you’re a pro that needs very specific readings, this thermal cam works right out of the box. That box also includes a Lightning adapter and 19.7-inch extension cable, if you need them.
How thermal imaging worked to track down hidden cameras
Thermal imaging is one ward against hidden cameras in vacation settings, which are unhappily common in Airbnbs around the world. I have a guide on several tricks you can use to spot these cameras when first entering an Airbnb, and one of the most effective is using a thermal camera. With the P3, you don’t need to lug around an extra device, either.
But how well does it work? I tried hiding both an Onn wired and a Eufy wireless camera at home to see how well the camera picked them up with a scan. As you can see, the wired camera is basically invisible when it’s tucked behind books in a bookshelf, even though it can see through the gap. But the thermal imaging picked up its heat at once, warning that there’s something back there to find.
The wireless camera was a bit more difficult to detect, since it doesn’t heat up much unless in use for an extended period of time. However, the camera still noticed something odd in the dark closet when it registered a spot that was a couple of degrees higher than the surrounding area, pinpointing it for investigation. Tricks like these can work with vents and many other spots where hidden cameras exist, as long as you’re scanning a foot or two away.
Note that wireless cameras like these often need a nearby hub to connect to. The Thermal Master cam immediately spotted the hub for this camera hidden behind a sofa, so that’s something else to watch for if you’re tracking down suspicious devices.
Also, the heat mapping features, complete with pinpointing temperature, are nice for spotting other problems with a vacation home, like drafts, leaks, pests and other issues I cover in this review.
Spotting insulation and AC issues around the home
A common purpose for these versatile phone add-ons is spotting places in a home where insulation is inadequate and the home may be leaking hot or cold air, wasting money on energy bills. Finding a spot like this could be the start of a DIY spray insulation project or similar work that will help save money for years to come.
Take a look at my window on a warm summer day to see just how much the plastic trim can heat up. That’s one reason updated weather stripping and keeping windows tightly closed is so important when keeping cool air inside. But weather stripping is only part of the problem.
Here are pictures of the vaulted ceilings in my living room and bedroom (I was holding the camera horizontally for these). Notice the clear heat spots on the corners of the first living room ceiling and wall image, a sign there are insulation issues warming my house up unnecessarily, which may be worth a future look. Then see the bedroom ceiling image, where insulation is much better and no heat spots exist.
Finally, here’s a shot of one of my main return air ducts in the ceiling. While some of this may be reflection from the ductwork, overall it looks like the air is passing through a hot zone here, which means my AC has to work harder, and could be an indication of ceiling crawlspace issues, as this video explains.
Accurately pinpointing complex insulation issues requires carefully comparing inside and outside readings at different times of day, plus spending time in your crawlspace looking for problems. It may be best to leave that up to the pros, but readings like this are an excellent starting place, or the beginning of a quick DIY project like replacing weather stripping or spraying extra insulation.
Looking for leaks
Thermal Master also mentions its cameras can to spot ongoing water leaks in walls or ceilings. The company says this works because the leak area is significantly cooler than its surrounding materials.
I didn’t have any drywall available to test a leak on (well, none I was going to damage), but I did have something similar: Thick cardboard. I trickled normal tap water on a section, then turned the camera on to see if I could tell a difference. The water immediately showed up as a significant cold spot, so as long as the leak hasn’t dried up, it looks like you really can spot them with the thermal camera.
However, tracking the source of leaks is difficult, so it’s important to do a slow, careful sweep when looking for the leak, and see where readings are coldest, which typically points the way to the origin of the leak — or at least lets you know you need to call a plumber, pronto.
What about detecting pests like bugs or rats?
Alas, I don’t have a pest infestation in my home to test thermal detection. I did some quick scouting for an ant hill to view, but couldn’t find any in time for the review. However, based on my other experiments, it should certainly be possible to spot large pest problems in a home, especially if you position the camera close to walls or vents.
You know those stories about people who discover they have an entire hive of bees hidden behind their walls? The P3 could definitely detect a problem of that size. The same may be true of a large rat nest in vents, or raccoons sleeping in the attic. But for additional action, you should probably arrange for a professional pest inspection.
Final thoughts on the Thermal Master P3
The Thermal Master P3 is part of a new wave of thermal imaging devices that snap onto your phone, and it’s one of the highest quality versions I’ve seen. At around $300, it’s pricey, but less expensive than many home inspections and an excellent starting point for identifying a problem, making future plans or even diagnosing circuit board issues.
Plus, if you travel or vacation frequently, you can keep using the attachment as an easy way to spot hidden cameras and surveillance devices whenever you need to. Just keep in mind its limitations. You will need to be within a couple feet for the most accurate results, and reflective or metallic surfaces can cause inaccuracies.
While a phone add-on like this may not be for everyone, I’m confident anyone could use it, with setup taking only minutes and results useful in numerous situations. Pros and more serious amateurs also have access to a wealth of adjustment and custom modes they can use for deeper analysis. Just keep that powerful lens in its case when not in use, so you don’t damage it.
Next up? I need to try that birdwatching mode and report back.