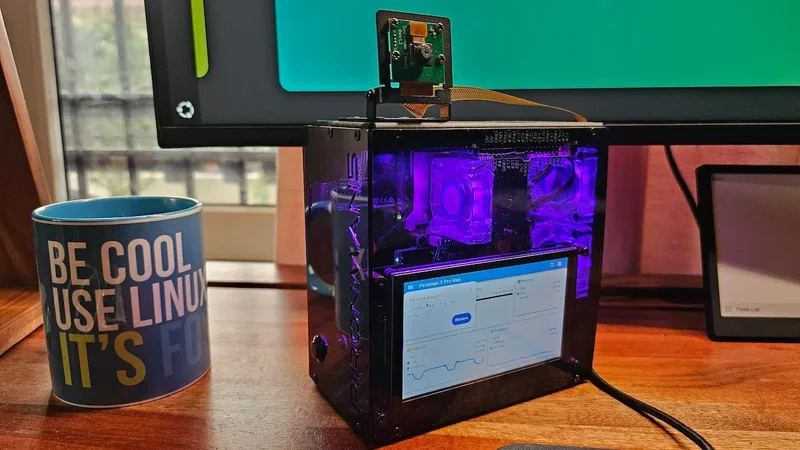
Pro Max is the fourth case in SunFounder's famed Pironman 5 case series. These tower cases turn your regular, naked, Raspberry Pi boards into a miniature tower PC.
So here, you get RGB fans and tower cooler for colling, RGB lights for asthetics, small OLED display for stats, full HDMI ports, GPIO pins exposed, NVMe HAT for adding SSDs and AI accelerator.
That's what more or less these cases offer. Only the Pironman Mini has fewer options.
I have used all of these cases so far, thanks to SunFounder sending them for the review. The first Pironman 5 case is used for my daughter's desktop setup. And then I use Pironman Max for running Nanoclaw AI agent 24x7 along with other homelab and smart home automation experiments.
The new Pironman 5 Pro Max has a 4.3" touchscreen, a camera, speakers, and a microphone in addition to what the Max version already offered. The new device is marketed around local AI. And that's what I would also like to focus on in this review, with whatever limited resources I have in my homelab setup.
✅ Touchscreen, camera mount, and USB microphone turn the Pi 5 into a capable AI desktop (for hobbyist projects)
✅ Ran cool, CPU stayed around 45°C under load in my testing
❎ Still a DIY kit
❎ No option to keep the small OLED display always on
The hardware
| Spec | Pironman 5 Pro Max |
|---|---|
| Compatible boards | Raspberry Pi 5 (2GB/4GB/8GB/16GB) |
| Power input | USB-C, 5V/5A |
| Cooling | PWM tower cooler + 2 PWM RGB fans |
| Display | Small OLED status display + 4.3" IPS touchscreen |
| NVMe support | 2x M.2 slots (2230/2242/2260/2280), PCIe Gen2 switch, RAID 0/1 |
| AI accelerator | M.2 Hailo-8/8L compatible, swaps in for one NVMe slot |
| HDMI | 2x full-size HDMI |
| Audio | 2x built-in speakers, audio amplifier, USB microphone |
| Camera | Adjustable camera mount |
| Extras | Metal power button, RTC battery, GPIO expansion |
The case costs $145.99. You can get it from SunFounder's website or from Amazon. I think the duty and shipping costs are included in the pricing, but confirm with them to be sure.
Raspberry Pi 5, NVMe SSDs, and the Hailo accelerator are not included. You're buying the case, the cooling, and the screens, and bringing your own Pi and storage.
Assembling the case
Like every Pironman case before it, this is a DIY kit. You assemble it yourself. As a reviewer, I get these cases to review before they are available to the public. And thus I get only paper manuals for assembly.
Not a big deal. I take pride in accepting and completing the challenge. And since I already had the experience of building the previous Pironman models in the past, this one was relatively quicker. No major issue in assembling the case.
However, if this is your first Pironman case, budget more patience for the paper manual than I needed to.
SunFounder usually releases assembly video for their cases. Surprisingly, there is no assembly video for this case so far. I hope they release one soon because it could be challenging.
It's a reversible case!
This is what I noticed while assembling the case, although reversible is not the correct word here. See, there is a super long FPC cable that connects to the camera mount. I found it awkward to have a long cable exposed like this.
It made sense when I saw that there was scope for the camera to be mounted on both top/bottom surfaces. Meaning, you vertically rotate the device by 180 degrees and you have the power button and IPS touchscreen at the top.
This gives you flexibility as the exposed GPIO pins also change their position.
If you use the case with the screen at the top, you need to rotate the display from the operating system; otherwise, it will display everything in reverse. Also, it makes sense to set a screen timeout to save on power.
The OLED and power button behavior, rethought
The small OLED display has changed behavior across every generation, and it's worth mentioning out because it affects how you'll actually use the case day to day.
The original Pironman case kept stats on the small OLED all the time. Pironman Max introduced a tap-to-wake gesture instead, where you had to tap the top of the case to see anything, and honestly, that was an annoyance.
The Pro Max changes this again. The small OLED isn't on by default anymore. You press the power button on the front to wake it, and pressing it again cycles through the different stats. To shut the system down, you hold the power button, the same way you'd shut down a real tower PC.
SunFounder has also pushed this new behavior back to the older Pironman cases through a software update, so if you own an earlier one, you'll see the same button logic after updating those Pironman specific Python scripts.
RGB fans, finally in sync
One thing that bothered me about the very first Pironman case was that the RGB lighting on the rear fans was slightly out of sync between the two fans. It's a small thing, but once I noticed it, I could not unnotice it.
The Pro Max doesn't have this problem. Both fans run in sync now, and the case looks the way it was clearly meant to look.
Configuring the visuals
Everything I've described, the OLED behavior, the RGB lighting color and pattern, screen timeouts, is configurable through SunFounder's dashboard.
The bigger 4.3" touchscreen can be set to auto-dim and turn off after a period of inactivity, which is a sensible way to save a bit of power on an always-on device.
My one complaint is that there's no option to keep the small OLED always on for stats. If the old always-on behavior bothered some people enough to get a tap-to-wake option, and the tap-to-wake bothered others enough to get the current button-press behavior, the dashboard should really let you choose the original always-on mode too, for people like me who want the stats always visible at a glance.
Testing it as a local AI desktop
Pironman 5 Pro Max provides the following additional features from the previous Max version:
- 2 tiny speakers
- USB-based microphone
- IPS touchscreen
- Camera plus mount
This is where the Pro Max earns its "Pro" name, so I put together two small projects that utilize these four additional projects.
First, I built a voice assistant using faster-whisper, piper-tts, sounddevice, openwakeword, and psutil. It listens for the wake word "Hey Jarvis" and handles simple requests like reading out CPU temperature and usage, both through the speaker and on the touchscreen.
Second, I built a face greeter using opencv-contrib-python and piper-tts. I trained it on my own face and my daughter Ushika's face, so whenever the camera spots either of us, it announces "Hello Abhishek" or "Hello Ushika" through the speaker.
Note that Qt no longer ships fonts. Deploy some (from https://dejavu-fonts.github.io/ for example) or switch to fontconfig.
Watching for faces. Press 'q' on the window, or Ctrl+C here, to stop.
Recognized ushika (confidence 68.9) -> greeting
Neither project is complicated on its own, you could run both on a bare Raspberry Pi 5 with a webcam and a USB speaker.
What the Pro Max adds is that everything, the mic, the camera mount, the speakers, and the screen to show status, is already built into one desktop-style unit. That's the whole pitch of this case, and in my testing, it delivered on it.
The OV5647 camera module that came with the case is decent. The official Raspberry Pi AI Camera might have performed even better.
Similarly, if I had Hailo 8 AI accelerator in this setup, these AI projects could easily be expanded to more serious work.
Cooling well done
Even while running these AI workloads, the case stayed cool. CPU temperature usually lingered around 45°C and goes to 56°C under load in my testing. I haven't tried it with an NVMe SSD or the Hailo AI accelerator installed, since I don't own either, so I can't speak to thermals once you add those into the mix.
But since it has one tower cooler and two PWM fans, it should provide the best possible cooling.
A case that keeps growing with the Pi 5
The Pironman line has been evolving with actual user demand, and you can see it clearly if you've followed all three previous versions.
The original Pironman 5 was a tower cooler with room for one NVMe SSD. Pironman 5 Max added a second NVMe slot, so you could mix an SSD with a Hailo AI accelerator instead of just stacking storage.
The Pro Max takes everything from the Max and adds a 4.3" screen and a camera mount on top. That combination, camera or AI camera plus AI accelerator plus SSD, gives you pretty much every upgrade path you could want on a Pi 5 right now.
It's versatile enough to be a basic NAS, a local AI box, a Home Assistant hub, or whatever other Pi project you have in mind, all in a proper desktop-style tower instead of a naked board on your desk.
Is the Pironman 5 Pro Max worth getting?
At $145.99 barebone, this sits well above the original Pironman 5 ($79.99) and the Pironman 5 Max ($94.99). So, you should weigh your needs and wants.
If you just want solid tower cooling and a place to put one NVMe SSD, the original Pironman 5 still does that job for less. Although its gray aluminum look may not be as cool as the dark ones like Max and Max Pro.
If you want dual NVMe with RAID or a Hailo accelerator alongside storage, the Max covers that without the screen and camera premium.
The Pro Max is for a more specific person: someone who wants to build voice assistants, camera-based projects, a Home Assistant hub, or general local AI experiments on a Raspberry Pi 5, and wants the mic, camera, and screen already integrated into a case instead of duct-taped together.
If that's the project you have in mind, this could be a good option. The versatility on offer here, NAS, AI box, Home Assistant hub, general Pi project machine, is hard to match.
If this helped you, consider supporting It's FOSS
It's FOSS has been helping people use Linux for the past 14 years. Help us stay independent from big tech. Become a Plus member, enjoy ad-free reading and get 5 eBooks.