Tom's Hardware Verdict
The xTool M2 color craft laser and engraver brings crafting flexibility at a new low price while improving on several features, at the expense of the cutting blade and pen options offered by the M1.
Pros
- +New $549 entry price
- +Twin positioning cameras
- +Air assist integrated
- +Black ink added to print process
- +xTool Studio is generally good software
- +Fully enclosed with built-in extractor fan
- +10W diode, 20W diode, CMYK, 2W IR laser head options
Cons
- -Extras can soon push the price beyond $1,000
- -Non-refillable ink cart costs $99 to replace
- -Cutting base is just a flat metal tray
- -Provided magnetic material standoff clamps are flimsy
- -A few operational wrinkles
Why you can trust Tom's Hardware
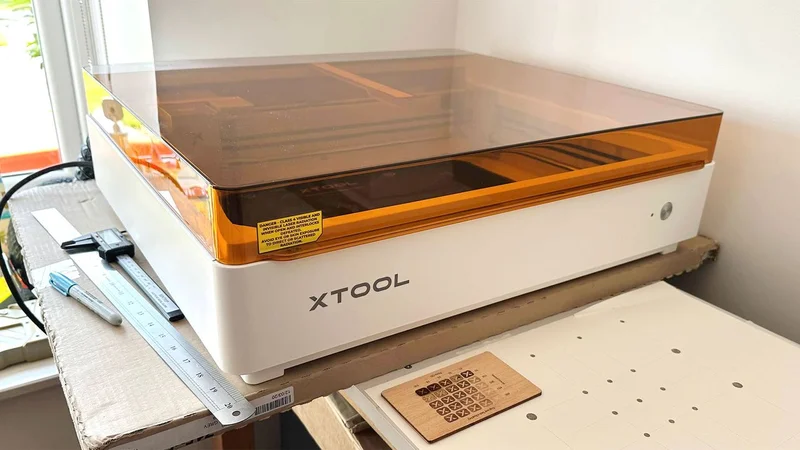
Here’s xTool’s second take on an all-in-one craft tool in a box. It isn’t just an iterative update to the xTool M1 Ultra. The new XTool M2 color craft laser and engraver thoroughly remixes the offering. Specifically, it throws out the previous model’s cutting blade and pen options. To compensate, it comes with a 10W diode, a 20W diode, CMYK, and a 2W IR laser head, “cut, print, engrave” options. Very worthy improvements, such as positioning and monitoring cameras, come as standard this time around. Furthermore, the print head offers CMYK inks instead of the washed-out CMY of yore, and laser air assist is included as standard. xTool’s new M2 also works with the RA3 Lite full wrap rotary accessory.
The xTool M2 10W base model is available for $599. This entry price makes the M2 about half the price of last year’s M1 Ultra. But this 10W ‘Standalone’ bundle includes just the machine and a 10W diode laser head. You’ll have to part with $699 (usually $749) for the 10W ‘Color Print & Cut Bundle’, which includes the CMYK print head and a cartridge. Moving up to $939 (usually $989) gets you the 10W Deluxe Bundle.
There are also bundles with the 20W diode laser head costing $400 more per tier (Standard, Color Print & Cut, and Deluxe). xTool also sells various print/cut heads separately, and they’re easily magnetically swappable. For example, it lists the M2 CMYK printing module with an ink cartridge for $169, extra cartridges are $99, and the RA3 Lite is $259. We don’t have prices for a 20W diode head (if you wanted to upgrade later), nor the 3W IR laser head that is shown on the promotional pages for the product.
You might prefer the 20W diode laser for faster, deeper cuts. xTool says it raises the max basswood cutting depth from 8mm to 10mm in one pass. For acrylic, it is much better, raising the cutting thickness from 3mm to 8mm in one pass with the 20W diode laser installed.
The default 10W diode laser supplied will be good enough for cutting and engraving plenty of materials for many crafty users. Officially, the following tabulated materials are cuttable, engravable, and printable.
| Cuttable | Wood / Opaque Acrylic / Paper / Cardstock / Cardboard / Foam / MDF / Leather / Felt |
| Engravable | Wood / Opaque Acrylic / Transparent Acrylic / Leather / Stainless Steel / Aluminum / Plated Metal / Paper / MDF / Cardboard / Felt / Rubber / Glass / Plastic / Cork / Ceramic |
| Printable | Paper / Cardstock / Sticker Paper / Wood / Canvas / Fabric / Felt / Leather / Glass |
You will see examples of cutting, engraving, and printing on various materials during our test process below.
As mentioned, the newest Color Craft machine from xTool improves on the older and more expensive model by integrating a pair of positioning and monitoring cameras. There’s also a separate camera for fire hazard monitoring and alerts. Another improvement on the original comes via the integration of air assist for the laser. Fan-powered extraction, with corrugated flexible extendable pipe, is another welcome new standard feature. As with the previous model, we have a laser-safe tinted enclosure lid, which should mean your eyes are adequately protected when the machine runs with the lid closed.
Get Tom's Hardware's best news and in-depth reviews, straight to your inbox.
Finally, the newest Color Craft laser from xTool now comes with the excellent xTool Studio software we last used alongside the formidable xTool P3. This is a comprehensive package for laser control and output, as well as for guiding you through wizards, generators, apps, and plenty of projects online. Most projects I completed went easily, from photo and/or illustration and layout to output. I did hit a couple of bugs, but more on that later.
Specifications: xTool M1 Ultra
|
| 24.4 x 20.5 x 9.8 inches |
|
| 16.7 x 12.5 inches (425 x 318mm) |
|
| 13.7 x 11.8 inches (348 x 300mm) |
|
| Wood, paper, leather, fabric, felt, vinyl, cardboard, coated metals (engrave), plastics, etc. |
|
| 455nm diode laser |
|
| 10W or 20W diode modules |
|
| CMYK print head, 2W IR laser head |
|
| 0.01mm positioning precision |
|
| Removable flat metal tray, 4x magnetic standoffs provided |
|
| USB‑C · Wi-Fi |
|
| Dual‑camera preview · auto‑alignment · xTool Studio software |
|
| Class 1 enclosure · lid‑open stop · emergency stop · flame detection camera |
|
| 24.4 x 20.5 x 9.8 inches |
|
| ~22 pounds |
|
| $599 10W |
|
| May 27, 2026 |
xTool M2: Included in the Box
The device was well packed, with everything padded and secured nicely for transportation. Moreover, it won’t be that tricky to get it back in the box as it is a simple shape with no machine assembly required.
In addition to the desktop laser chassis, we got the 10W diode head, a power brick and IEC cable with region-appropriate plug, a USB cable to connect a computer (need to set up by cable before using Wi-Fi), a short USB cable to connect the accessory head to the magnetic holder on the gantry, some grease for the transport system, a USB-A to –C adaptor, a hex-driver, masking tape, and a few pieces of material for setup, calibration, and test.
We got the 10W Deluxe Bundle (though in several deliveries, not boxed together). We received the print head and cartridge, the rotary tool, and a few more slivers of sample material.
Design of the xTool M2
xTool has designed the M2 as a fully enclosed box with a laser-safe orange-tinted acrylic top. The machine only operates with the lid closed.
You open the lid to position your work within the 16.7 x 12.5 inches (425 x 318 mm) lasering area. However, please be aware that for multi-stage color craft projects, where you will want to swap between laser and CMYK print heads, the print area is a smaller 13.7 x 11.8 inches (348 x 300 mm). I didn’t have any size/area mismatch surprises during my projects as the software preview made one aware of the overall working areas available.
Swapping tool heads is quick and simple. The heads are magnetic, guided accurately and firmly into place by a trio of short metal rods. Then you connect the provided USB-C cable, which is the perfect length for the job. xTool Studio software is smart enough to know what kind of head is installed, and you should switch to it in the midst of multi-step processes.
A big convenient step up from the prior generation is the integration of cameras into the new machine. There’s one camera in the center of the lid to snap the whole of the bed. Meanwhile, the machine’s gantry-attached head also has a camera on one side, and you can use it for closer detail shots and/or monitoring the cutting/printing work. There’s actually a third camera in one corner, but that is devoted to flame detection. A couple of times during testing, that flame detection paused a job I was working on, with a loud beep. However, checking and resuming didn’t seem to have any impact on the finished job’s quality or accuracy.
The cameras also integrate with xTool Studio to focus correctly on the workpiece surface, and to provide auto-material detection. That second feature works best with xTool-supplied materials which come with a QR code so the software knows exactly what the material properties are.
Other good things about the new M2, compared to the predecessor, are the built-in air assist, which can help with clean engraving and deeper cuts, as well as the provision of a new print head with a dedicated black ink tank. The extra black ink should improve the contrast of the print output and make it closer in quality to a decent modern inkjet printer. We will see about that later in the review.
Assembling the xTool M2
Commissioning the xTool M2 was pleasingly simple. The unit came out of the box fully assembled. All a buyer has to do is carefully take off all the peels and remove strips of tape that hold the lid and other parts in place, and after that, it will be almost ready to go.
Once I got it on the desk, I opened the lid and took out the bits and pieces of xTool supplies to get the machine set up. Everything I needed was here for setup, including USB cables, grease for the gantry movement mechanism, a screwdriver, an exhaust pipe, and various materials that are used during calibration.
With everything plugged in and powered up, and connected to the computer, the xTool Studio software guides you through initial calibration for the magnetically attached head you have installed. As ours came with the 10W diode head in the first package, I calibrated this by following the ‘wizard’ style step-by-step process. It was easy enough to subsequently find the calibration menu again the next day, when the CMYK print module arrived.
Safety Precautions for the xTool M2
We’ve already mentioned that the M2 claims to be Class 1 safe, with its enclosed design stopping accidental exposure to unhindered Class 4 diode laser light. xTool provides documentation and online guidance that users are encouraged to check out to ensure safe operation. Do not try to override the built-in safety, as the diode laser within could damage eyes and burn skin.
Another safety issue with lasers is addressed with the third camera we mentioned previously. This corner camera monitors smoke and flames, which can flare up when some materials are engraved or cut.
Lasers can also create toxic fumes, depending on what they’re engraving and/or cutting. While you can hook up the xTool M2 to various workshop extraction and filtering equipment, it is good that it comes as standard with a powered fan and flexible extending corrugated exhaust pipe. When I positioned my xTool M2 test unit, it was convenient to shove that corrugated hose out of the window. It worked very well during testing, evacuating smoke made when cutting materials quickly and effectively. The exhaust fan is smartly controlled by xTool Studio, which auto-adjusts speed and duration of operation.
Software for xTool M2
Just like with the xTool P3 and the F2 Ultra, the new xTool M2 color craft laser and engraver is designed to work with the free bundled xTool Studio software. The software looks and works like many other bundled laser software suites for engraving, scoring, and cutting tasks, easily applying multiple output settings across several project layers. The familiar illustration style primitives and type handling might be good enough for creating some projects from scratch, but you can also make use of wizard-like apps to guide you through popular tasks like making arrays and grids, and other repeating designs, as well as more complex projects like boxes and jigsaws.
Traditional software-based graphic creating tools are augmented in xTool Studio with AI-driven generators, custom apps, as well as convenient in-UI access to large online project libraries, notably Atomm.
Of course, the xTool Studio software handles the multi-stage workflows that products like the M2 enable. Making hybrid projects that mix color graphic printing, laser engraving, and cutting was a cinch. The software also works great with accessories you might add to xTool M2 bundles like the rotary accessory, and probably the UV laser head (which we didn't get to test this time).
Engraving / Cutting with the xTool M2
Now comes the fun part. I prepared a number of projects that I thought would adequately test the cutting, engraving, and printing prowess of the new xTool M2 color craft laser and engraver, to give it its full title. I started with the laser-toting fan favorite of a plywood surface engrave test.
I got a piece of xTool’s 3mm birch ply, which provides a pale and characterless wood surface for engraving detail and is pretty quick to cut cleanly, even with a 10W diode laser. The first job on the M2 was to output the usual variable speed and power engraving test grid. This provides a good visual light-to-dark shading guide for any later pale wood projects. There are quite a few usable shades here, even at the fastest speed of up to 600 mm/s. The xTool M1 Ultra was limited to 300 mm/s at best.
xTool Studio made setting up the test grid easy with a click-and-go generator. However, my first burn seemed to use the same settings for every ‘X’ so I had to select and type in the appropriate values for each segment and output it again. Thus the generator wasn’t much of a labor saver. Hopefully this bug will be fixed in due course.
I stuck with pure laser output for my first tests. I’ll do CMYK printing and hybrid jobs later. So the next thing I did was try a simple line art engrave onto a slate coaster. You can see the result of this in the images - a stylized silhouette of a tree on stone. The output is very pleasing, and it worked like this first shot using the xTool M2’s rock coaster engraving preset. I didn’t do any special surface preparation or finishing. I just cleaned the slate with a brush before setting off the M2 engrave process.
Next up, I got out my painted aluminum business card blanks. The red one you see in the images was created with the xTool M2. It looks nice and sharp at first glance. Only when you zoom in to high-res images can you see a slight resolution advantage on the black card, which was engraved when I tested the xTool P3 CO2 laser. The red card has slight jaggies under scrutiny.
Satisfied with the engraving so far, I felt it would be good to look more closely at the new CMYK print capabilities. Using art paper supplied by xTool, I printed a colorful flower picture, which you can see positioned in my photo next to the same image on my laptop’s lovely OLED screen. The printed output lacks contrast and pop in comparison, but to be fair to xTool, I hadn’t used special (glossy finish and high-white) photo paper, which would squeeze the best print quality from this kind of inkjet printer module.
What about comparing the xTool CMYK output to a professional lithographic print I had produced a few years back (2007!)? You can see my original illustrated menu was printed on a nice heavy card stock by commercial firm Priority Print. I’d actually say that the xTool’s output is just as nice, but would benefit from being a bit darker/denser. Both prints came from the same PDF file. Apologies for the black circle on the xTool M2’s printout, that’s from a calibration I did earlier.
With two comparison prints produced so far, if I were a perfectionist I’d be tempted to adjust the levels of the xTool print output to be a bit darker and up the contrast.
Now let’s use some of the hybrid output ability of the xTool M2. I saw a project in the xTool Studio library with a wood version of tic tac toe (noughts & crosses) but thought it looked a bit basic, so I fired up Illustrator to make a nicer stylized version, which I dubbed Fridge Tac Toe. I intended to add magnetic pads to the cutout shapes and board and make the game fridge-friendly.
The M2 outputs the color sections with its CMYK head. It then asked me to change to the laser head, and proceeded to cut the shapes, followed by the board. There were a couple of processing wrinkles, but I salvaged the project without issues. Specifically, the laser cut around the inner rounded rectangles twice, and that action accidentally lasered some pieces that had already dropped onto the bed. I’m not sure if it was my source file at issue, the settings, or a software bug. Thankfully, I had decided to cut some spare O's and X's.
Slightly more ambitious, I decided to make a jigsaw from one of my favorite holiday photos. The xTool software generated this for me once fed an image. All I had to do, I thought, was make sure to position it carefully within the common area where printing and lasering can be achieved.
As you can see from my jigsaw-making gallery, the first attempt wasted a sheet of plywood and plenty of ink. For some reason with this first attempt, the jigsaw lines were printed on top of the image – not necessary. Also, the run order ruined the project. The machine cut the outer frame of the jigsaw first. This caused the center (what would have become the jigsaw pieces) to fall immediately down onto the metal bed, which is about 6 or 7 mm lower than the standoffs that had been holding the wood sheet up. Thus the laser wasn’t focused to cut, and even if it had been capable of cutting, we’d get a lot of burn on the back of the piece due to a lack of air gap under the work.
After aborting the beach photo jigsaw, I picked another holiday photo featuring a yacht and ran the jigsaw generator again. This time I edited the resulting project work on the xTool Studio canvas. I selected the outer frame cut and made sure it would be the last action of the laser by putting it on its own last-in-order layer. This ensured the layers would be processed in the following order: photo print, jigsaw pieces cut, jigsaw pieces outer frame cut. This worked nicely, with a very handsome and accurately cut working jigsaw at the end. Using a ‘honeycomb’ cutting bed would have been better for this style of job.
Another hybrid job I output was some stickers for the grandkids. These cartoon illustration versions of photos were generated by an AI tool, and I used the xTool Studio to generate offset cutting forms to match each one.
I couldn’t find a preset for this kind of sticker cut out in the xTool software. That was a surprise, as I saw lots of stickers in promotional material. Anyway, printing looked great, and my guestimated laser cutting using one pass at 15% power and 15mm/s speed was perfect. It cut the stickers cleanly without cutting the backing material.
My final project made use of the supplied RA3 Lite rotary accessory. It was a bit fiddly to install and it meant fixing a different magnetic head adapter to change the orientation of the printer / laser (see images). Also, the xTool M2’s camera positioning functions stopped being useful when in this mode.
I planned to engrave some terracotta plant pots, one for pencils, one for herbs. So, I prepared some line art logos for this labeling purpose, and then imported them into xTool Studio. There I selected the rotary output option for the M2, and followed the steps to measure the usable (engravable) surface and its slope / profile.
Multiple grip adaptors are provided with the RA3 Lite rotary chuck, so I could turn the work around and then engrave the plant pot rim. That was an important technique to get used to, because you can’t engrave close up to the chuck. I think the user-addressable zone of the work in the chuck starts about an inch away from the chuck jaws, probably to prevent head/chuck jaw collisions.
Finally, I got some pretty nice results with the laser engraving of terracotta, so I’m pleased with the handsome textured finish which you can see in my gallery.
Bottom Line
I found the xTool M2 to be a great one-stop shop for craft projects. Most of the ideas I had for cool things to make went from ideation to finished output with very little friction from the machine or bundled software. Lots and lots more projects using a far wider range of materials (check the above chart) are possible. Moreover, xTool Studio’s built-in generators, AI, and integration with project libraries via Atomm make it easy to get more inspiration even if you don’t paint, illustrate, or DIY design.
From looking at the print samples from the M1 Ultra, I’m certain the CMYK output from the M2 is much better and more usable for hobbyists. If you were to do a lot of print work, or something like a production run, I think it would be worthwhile tweaking to optimize contrast, though. Remember it is inkjet, too, so the print surface makes a lot of difference, and you may have to lacquer the surface after printing to make it moderately splash-proof.
The entry-level pricing of $599 looks like a good move from xTool. Adding $150 for the CMYK head and a cartridge doesn’t seem exorbitant – until you realize ink refills are $99. This so-called ‘Color Print and Cut Bundle’ makes the most sense to get the best of the xTool M2’s most attractive features from day one.
While the 10W (default) and 20W diode laser heads are very flexible across use cases and materials, those with a particular interest in metal projects (and some plastic types) might like to add the 3W IR laser head. I’ve heard that’s an extra $499, though, so you’d really have to have a few important projects in mind to pay almost the same price as the M2 laser alone.
The xTool M2 deserves a place in our list of the Best Laser Cutters and Engravers. However, if the added flexibility of this all-in-one print and cut machine isn’t something that tempts you, there may be better choices. For example, our recommended xTool S1 with a 40W diode laser head can get things done quicker and cut deeper for not a lot more than the M2 20W.
Mark Tyson is a news editor at Tom's Hardware. He enjoys covering the full breadth of PC tech; from business and semiconductor design to products approaching the edge of reason.